At Singlemind, we're integration geeks. Our geek nerves tingle over custom systems integration projects, Yahoo Pipes, Zapier, If This Then That and so many others. We use Redmine as our issue management system and Harvest for time tracking and billing. We found ourselves wanting to use the time tools inside of Redmine, but were unable to efficiently manage the overhead of keeping two systems' time in sync. We tried out a couple Redmine plugins that could leverage the Harvest API. However, we quickly found that the plugins we tried used admin-only features of the Harvest API, so our employee users could not make requests to the Harvest API and thus not use the plugin with any efficiency. Unable to find any suitable Redmine plugin, and also being Ruby on Rails geeks, we set out to develop our own Redmine plugin.
Technically, this plugin is used to sync time entries made in Harvest with issues in Redmine by scanning the notes field of incoming Harvest entries for a 2-5 digit number which would correspond to a Redmine issue ID. When an issue is found it adds time to Redmine accordingly (and attempts to carry over the task name from Harvest). There's also a feature to set custom filters based on some combination the project name, task name, or a string occurrence (regex) in the notes. Entries from Harvest are displayed in the Redmine UI using the jQuery DataTables plugin which offers filtering, paging, and some other snazzy UI elements. The lib/tasks/redmine_harvest_smc_rake.sh file can be put into the system crontab to establish regular sync jobs for all the registered users.
We've shared this plugin on our Github page. Please leave feedback in the comments here or give us pull requests if you find bugs or improve the code!
https://github.com/singlemind/redmine\_harvest\_smc
Here's a quick tutorial: Update the password and salt used to encrypt Harvest usernames and passwords. Lines ~31,32,46, and 47 of app/models/harvest_user.rb (GRC is a great resource of random strings)
Verify the plugin is installed by visiting the plugins section of your Redmine instance. Click on the "settings" link for the redmine_harvest_smc plugin and enter the URL prefix of your Harvest account.
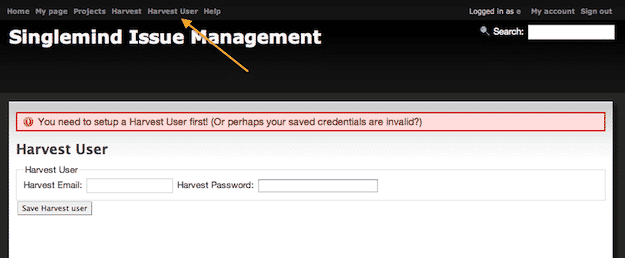
Once you log in you'll notice a couple extra links in the header of Redmine– go ahead a click the "Harvest User" link and enter your Harvest login credentials.

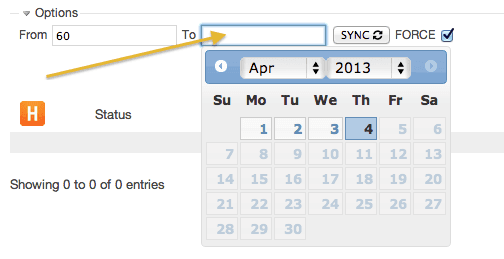
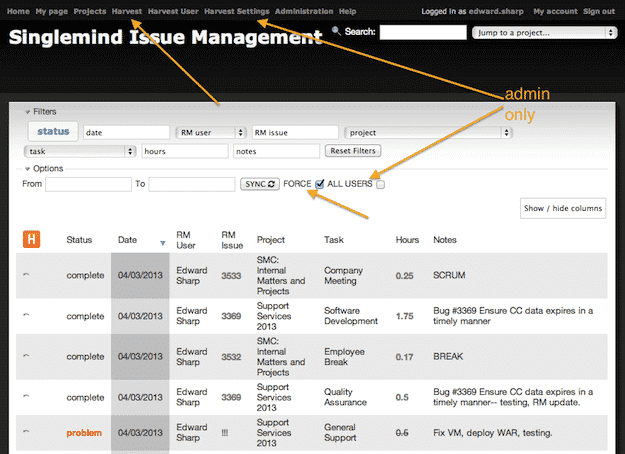
So now you can click on the "Harvest" link and begin syncing Harvest Entries. Select a "from" and "to" dates and click "SYNC" button and you're off to the races. When checked, the "FORCE" option will first drop all the associated time entries for the timeframe selected and then import fresh from Harvest– it's enabled by default. You probably will never need to change this. Redmine admin users get a checkbox to sync entries for all users.

This is the main view built with jQuery DataTables that includes all synced Harvest entries. Issues that don't have an associated issue will be marked as "problem". To resolve simply enter an issue ID in the Harvest notes– use the ⃔ link to go to the timesheet on harvestapp.com for that day.

Here are some basic filters used for filtering data in the Harvest entry table.

As well as some other useful controls for changing how the table looks.
How to Install
- Copy your plugin directory into
#{RAILS_ROOT}/plugins (Redmine 2.x)
Or
#{RAILS_ROOT}/vendor/plugins (Redmine 1.x).
If you are downloading the plugin directly from GitHub, you can do so by changing into your plugin directory and issuing a command like git clonegit://github.com/user_name/name_of_the_plugin.git - Update the password and salt used to encrypt Harvest usernames and passwords. Lines ~31,32,46, and 47 of:
app/models/harvest_user.rb - If the plugin requires a migration, run the following command to upgrade your database (make a db backup before).
For Redmine 2.x:rake redmine:plugins:migrate RAILS_ENV=production - Restart Redmine. You should now be able to see the plugin list in Administration –> Plugins and configure the newly installed plugin (if the plugin requires to be configured).
- Enter your Harvest subdomain (e.g. http://subdomain.harvestapp.com/) on the settings page for this plugin.
- Enter your Harvest credentials on the "Harvest User" page linked in the top header menu in Harvest.
How to Uninstall
- If the plugin required a migration, run the following command to downgrade your database (make a db backup before):
For Redmine 2.x:rake redmine:plugins:migrate NAME=plugin_name VERSION=0 RAILS_ENV=production - Remove your plugin from the plugins folder:
#{RAILS_ROOT}/plugins (Redmine 2.x) - Restart Redmine.


